Tuesday, May 22, 2012

Two Year Anniversary

It's really hard to believe that it's already been two years since our wedding!

And, even more so, I wish we were heading to Paris tomorrow! We're not, obviously, but really hoping to go back soon!! Here are some pictures from our honeymoon.

Last year, Kevin and I were busy working on the kitchen at our house around our anniversary, our gifts to each other were our new kitchen appliances ;).  We went to Fearrington House for a delicious dinner and celebrated with an anniversary cake from Sweet Memories and Mumm champagne from our honeymoon. 

Tonight Kevin and I are going to Second Empire in downtown Raleigh for dinner.  I'm really excited because we haven't been before and they always get really good reviews. Plus a lot of their food has a French influence, which will be perfect! 

These last two years have been so amazing and such a whirlwind! It's fun to think about all of the things that we've done and how far we've come. I'm so happy and blessed, we can't wait to see what the future has in store for us! 

Monday, May 14, 2012

Red & White Ombré Cake

This weekend was both my brother's graduation from NC State and Mother's Day!


To celebrate, I decided to make a single cake to honor both occasions.  I had to do a bit of searching to find anything similar to what I wanted to create and ended up pulling recipes from two different cakes for the final product.  I wanted to tie in both red and white for NC State's colors and pinks for Mother's Day. You've probably noticed that ombré anything is super popular right now. So, I decided to make a cake with a red velvet bottom layer and a white cake top layer, with pink layers in between... a Red Velvet & White Ombré  Cake!


Red Velvet & White Ombré Cake
For the red velvet-based layers:
2 cups sugar
1/2 pound (2 sticks) butter, at room temperature
2 eggs
2 tablespoons cocoa powder
1.5 ounces red food coloring
2 1/2 cups cake flour
1 teaspoon salt
1 cup buttermilk
1 teaspoon vanilla extract
1/2 teaspoon baking soda
1 tablespoon vinegar

For the white-based layers:
2 1/4 cups cake flour (9 ounces), plus more for dusting the pans
1 cup whole milk, at room temperature
6 large egg whites (3/4 cup), at room temperature
1 teaspoon almond extract
1 teaspoon vanilla extract
1 3/4 cups granulated sugar (12 1/4 ounces)
4 teaspoons baking powder
1 teaspoon table salt
12 tablespoons unsalted butter (1 1/2 sticks), softened but still cool
red food coloring (about 1 tsp or 1/2 ounce)

note: To make a four layer cake you will make two different colored 9" layers from each and there may be extra batter.

Preheat the oven to 350 degrees and start with the recipe for the bottom, red velvet layers. Grease and flour two 9" pans.  Cream the sugar and butter, beat until light and fluffy. Add the eggs one at a time and mix well after each addition. Add cocoa and about 1/2 ounce food coloring to sugar mixture; mix well. Sift together flour and salt. Add flour mixture to the creamed mixture alternately with buttermilk. Blend in vanilla. In a small bowl, combine baking soda and vinegar and add to mixture.

Pour about half of batter into one of the pans. Add more red food coloring to the remaining batter, so that it becomes a true red in color. Pour the batter into another pan.  Bake for 20 to 25 minutes, or until a toothpick inserted into the center comes out clean. Remove from heat and cool completely.

For the white layers, spray two 9-inch round cake pans with nonstick cooking spray; line the bottoms with parchment or waxed paper rounds. Spray the paper rounds, dust the pans with flour, and invert pans and rap sharply to remove excess flour. Pour milk, egg whites, and extracts into 2-cup glass measure, and mix with fork until blended. Mix cake flour, sugar, baking powder, and salt in bowl of electric mixer at slow speed. Add butter; continue beating at slow speed until mixture resembles moist crumbs, with no powdery streaks remaining. Add all but 1/2 cup of milk mixture to crumbs and beat at medium speed for 1 1/2 minutes. Add remaining 1/2 cup of milk mixture and beat 30 seconds more. Stop mixer and scrape sides of bowl. Return mixer to medium speed and beat 20 seconds longer. 

Pour half of batter into one of the prepared cake pans; using rubber spatula, spread batter to pan walls and smooth tops.  Add red food coloring, 1/2 to 1 tsp, to the remaining batter until the desired light pink is achieved and stir. Pour remaining pink batter into pan.  Arrange pans at least 3 inches from the oven walls and 3 inches apart. Bake until toothpick inserted in the center comes out clean, 23 to 25 minutes. Let cakes rest in pans for 3 minutes. Loosen from sides of pans with a knife, if necessary, and invert onto wire racks. Reinvert onto additional wire racks. Let cool completely.

To assemble the cake, place the darkest red velvet layer on the bottom, and add a thin layer of cream cheese icing. Place the lighter red layer on top, followed by cream cheese icing. Place the light pink layer on top, frost, then finally add the white cake layer. Frost the cake with a thin crumb coat of cream cheese icing and place in the freezer for about 10 minutes.  Then, finish the cake with a smooth layer of icing and serve!

sources: Modified from Paula Deen and Cook's Illustrated

Cream Cheese Icing
8 oz. cream cheese, room temperature
12 tbs butter, room temperature
1 teaspoon vanilla
6 cups powdered sugar

Beat cream cheese and butter on high until creamy, then add vanilla. Pour in the sugar a little at a time, be sure to scrape the bowl with a spatula often.  Mix until fluffy.  Frost the cake and be sure to store in the fridge afterwards. 


I hope everyone had a great Mother's Day weekend! 

Monday, April 30, 2012

1 Year!

Yesterday marked one year since we closed on our new house.  We have loved living in our house and I can't believe how fast time has flown. We've gotten a lot accomplished around the house too! So, I thought I would go through the big changes and progress that we've made.

Kitchen
The kitchen was the first project that we took on, we wanted it to be nearly complete before we actually moved in. I couldn't imagine living in a house without a functioning kitchen while you try to renovate. So, we took advantage of still living in our apartment in order to get everything done quickly.

Living Room
We didn't do that much in the living room. We painted the walls the same as the kitchen, BM Smoke, and were able to use our previous furniture. I did find a fun printed chair at HomeGoods that helps to tie all of the colors together. This room is more about function than aesthetics, it's where we spend most of our time.

Deck & Backyard
We stained the deck last summer and got new outdoor furniture to make both a dining and seating area.  We have enjoyed this area all year long, but it's really great when the weather is nice and we can grill out.
I've also enjoyed watching the plants that we've planted grow and fill in. I love this section of our garden and the flagstone pathway that we added last summer.  The butterfly bush grows so fast it is fun to watch each week, it gets bigger and bigger. Even after having been cut down to stumps about knee high, it will grow more than 10 feet tall and it adds a lot of privacy. I also love the flowering bushes, the knockout roses that we added and the hydrangea that blooms almost all summer long.

Dining Room
We made a few changes to this room in addition to filling it with furniture. But, I think the things we did had a big impact. We installed wainscoting on the walls, which made the room start to look like a real formal dining room. Adding floor to ceiling curtains in a neutral, geometric fabric helped make the room feel bigger.  Overall, I'm happy with how this room turned out, even though it's likely to change and evolve with us over the next few years.


Guest Room
We've had a couple of guests stay with us this year, but mostly family members.  The guest room isn't really 'complete' but it's definitely better than an empty room. ;)

Library
This is our most recent project and we have gotten so many compliments on the bookshelves. They really dominate the room, but that's exactly what I wanted!  We need to work on wall decorations and finally finishing up the last few furniture pieces, two arm chairs and an ottoman. However, I'm really happy that we've gotten this far. I love to sit on the couch in this room and relax on sunny afternoons.


We still have a lot on our list of things to do around the house though. See my list of goals for 2012 here. Upstairs we need to decorate the bonus room and office and finish the master bedroom.  We are also planning to do a lot more work outside. We've got the backyard looking pretty nice, but the front still needs a lot of work.  We're planning to sod the front yard later this spring and that should make a big impact! I can't wait to see what the future looks like!

Thursday, April 19, 2012

Kelsey's Bridal Shower: the details

As you might have noticed in the last post, we used Kelsey's K monogram for the shower theme and we brought it in a lot of places.  So here are some more of the details from the shower, this post is definitely picture heavy ;) Things started out with the wreath that I made for the front door out of tissue paper flowers.  
Monogram wreath
I was inspired by the picture below from Pinterest and then I made a ton of little tissue paper flowers and tied them to a piece of poster board that I cut out in the shape of the K from the shower monogram.
 Cute wreaths
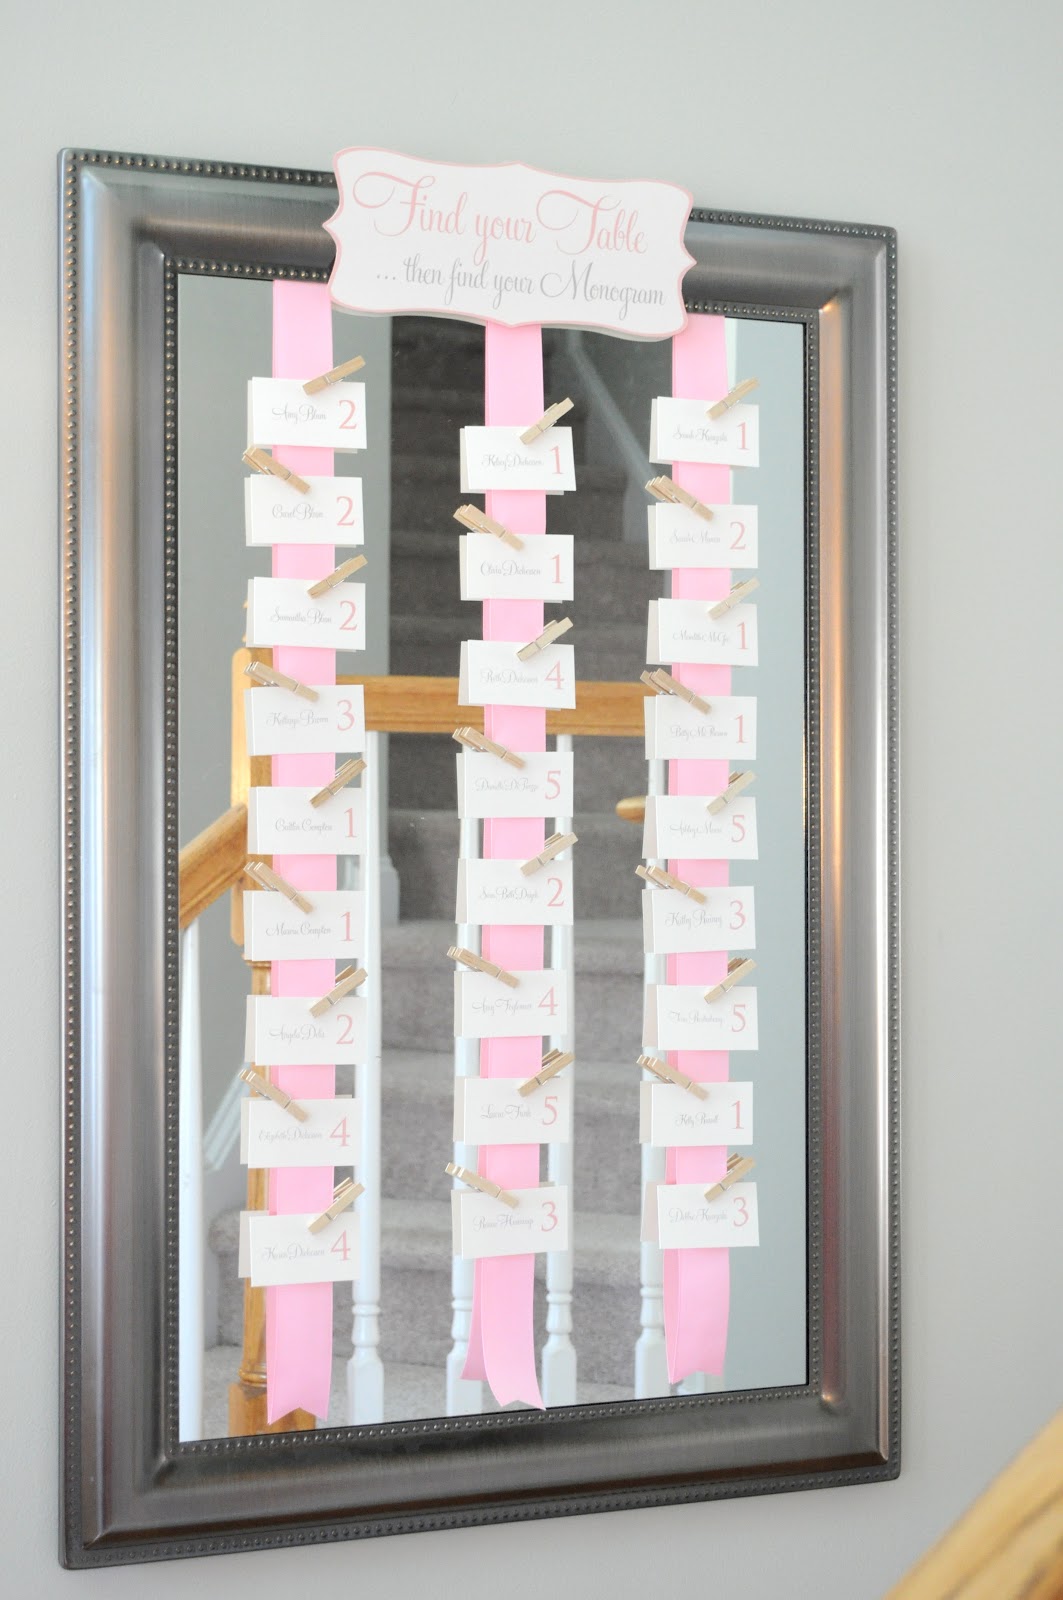
When guests entered the house, they found a silver mirror hanging with the escort cards.  The sign at the top says: "Find your table ...then find your Monogram" meaning find your table with your escort card and then find your monogram at your place setting.
Escort cards
The table numbers were created from wooden numbers that I got at AC Moore and painted with pink paint. I drilled a 1/4" hole in the bottom of each and inserted a dowel to be able to place each number in the vase.
Table numbers for centerpieces
 I created each centerpiece by hand with all of the flowers that we got at local shops. I love arranging flowers and making these low centerpieces was a lot of fun.  I tied pink ribbon around each centerpiece vase and added Kelsey's K monogram to tie into the theme of the event. 
Table setting
Then, once the guests had found their tables, their personal monogram was tied to a place card favor on top of their dessert plate.  I  filled clear boxes with different types of pink candies and tied them with silver ribbon and a card with their monogram.  As I mentioned before, the china and silverware was collected from different members of my family, the picture below is our wedding china mixed with my mom's sterling silverware.
Monogrammed place card favor
Table 1
Table 2
Since it was a really nice day outside, we had 3 more tables outside on the deck. Here I mixed up the pink and silver tablecloths and we had two square tables and one round table.  The centerpieces and table numbers were the same as the other tables.  I also used different silverware and china for each table out there as well. 
Tables outside
Round table with silver tablecloth

Inside, I decorated the mantle with lots of different glassware, including mason jars, bud vases, etc and filled them with different pink flowers. I placed all of this on top of wide pink ribbon that I had draped over the mantle.  I also hung the letters of Kelsey's new monogram from the mantle with pink ribbon. 
The mantle and gift opening area
To the left of the mantle and gift opening area was the gift table.  I covered the table in a pink tablecloth and by the start of the shower, this table was overflowing with gifts!
Gift table before the guests arrived with the rest of the gifts
As you might have seen before, I painted the K monogram by hand on the table runner that was on the food buffet. It took a lot of patience, but I think it was worth it. I loved how the pink runner looked on the silver tablecloth and differentiated this table from the guest tables.
Hand painted table runner
We had so much delicious food and I think everyone really enjoyed it.  There were so many options for sandwiches, quiches, fruit and veggies. It was really good and still pretty healthy for you! 

The dessert bar was also really fun.  I printed out a sign that said Love is Sweet and placed it in the middle of my bulletin board then filled the rest of the space with lots of pictures of Kelsey and Brandon.
Dessert bar
We had a ton of wonderful desserts and of course everything tied in with the monogram theme.  The cake from Sweet Memories had a replica of the monogram painted on a fondant topper.  Each of the jar desserts also had a monogram on the lid.  
Cake!
More of the desserts
I mentioned the drinks before, but we had a bellini bar to create your custom drink creations and lemonade and iced tea in large mason jar dispensers.  I created custom stir stick flags with Kelsey's monogram for the drinks and we had gray and white paper straws available for the sweet tea or lemonade.
Drinks at the bellini bar
Strawberry lemonade and sweet tea in mason jar dispensers
The decor and food was really great, everyone was pretty wowed. But, now down to the actual events of the shower! When the guests arrived, everyone had a chance to get a drink and mingle and we played an icebreaker game that actually went over really well.  We played the "what's in your purse game?" and it was fun!
What's in your purse game
Each guest filled out a card and got points for having certain items with them in their purse.  It was pretty amazing that multiple people got over 100 points!!
Playing the what's in your purse game
After lunch, we played a game that is a spin on the traditional toilet paper wedding dress game.  Instead of toilet paper however, the groups each received a bag with various supplies so that they could fashion their own more realistic wedding dress. Each bag contained satin, tulle, various types of white ribbon, silk flowers, bobby pins, safety pins and scissors. 
Wedding dress game bags
We gave the groups about 15-20 minutes to make their creations and it was a ton of fun.  We got a lot of really unique dresses and some pretty successful dresses. After their dresses were complete, we had everyone gather together in the living room for a fashion show to show off each dress.
One of the model brides 
Fixing the bride's veil
Wedding dress fashion show
Then, after all of the dresses had been shown, Kelsey got to pick the winner. It was a lot of fun and then she posed for a picture with the models. 
Kelsey with all of the model brides
While Kelsey opened her gifts, the guests played Bingo. Each person filled out a card with items they thought she might receive, then as Kelsey opened her gifts they marked them off. The first person to get 5 in a row won! It was a fun way to keep everyone interested in the gifts that were being opened.
Gift bingo
After opening all of Kelsey's wonderful monogrammed gifts, we played one more game before the event was over.  Sarah, the MOH, had asked Brandon 20 questions before the shower and we asked Kelsey the same questions to see if she could get them right!  The guests had to guess how many of the 20 questions they thought Kelsey would actually get right. Brandon happened to show up right before we started this last game, so he got to listen to Kelsey try to come up with all of the same answers.
The bride and groom
It was a wonderful day and I know everyone had a lot of fun celebrating the bride-to-be, Kelsey
Blogging tips