Wednesday, November 20, 2013

DIY Custom French Pleat Curtains

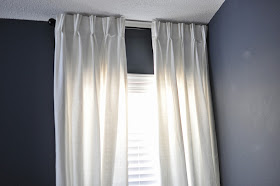
When we chose the dark blue paint color (Benjamin Moore Evening Dove) for our master bedroom a few months ago, we decided that we would hang white curtains from floor to ceiling to make the room feel lighter. The room has a vaulted ceiling, but I loved the high contrast look of the tall white curtains in other rooms. 

Shopping for curtain panels can be a pain... you need to find the correct length, material, and sometimes you get stuck between options like tap-top or grommets... which can be right for certain rooms and situations, but wasn't what I was looking for. I decided that I wanted either back-tab curtains or French pleat (pinch pleat).  Panels like these vary widely in cost, but a lot of times you will spend a lot of extra money just to get the pleat look. Well, here's a great and surprisingly cheap option for you to make your own French Pleat curtains using Ikea Ritva curtain panels. 

A pair of Ikea Ritva panels comes in either 98" or 117" lengths, so you get a lot of fabric for the low cost (you can always hem them to be shorter, if needed). I bought the 98" length and I'm really happy with how they look. Here's how I created the French Pleats.
 You will need to buy the panels from IKEA and then buy triple pleat hooks (like these) from somewhere like JoAnn Fabric or on Amazon. IKEA does sell some pleat hooks, but they are double pleat hooks and won't give you the same effect. If you want the triple pleat, you will need to buy the 4-pronged pins.
The nice thing about using the Ritva curtain panels, is that they have built in pleater tape into the header of the curtain. (If you are doing this with another kind of panel, you will need to sew this pleater tape into the top section of the curtain yourself) This means that you can create almost any design of pleats that you want... you just need to figure out where to put your hooks.
To start, put one of the prongs into a slot in the header.  Then, depending on how deep you want the pleats, place the second prong into another slot. Continue this until you have your finished single pleat.  Before you start your panel, you will want to decide how big you want each pleat to be and how much space you want to leave in between pleats. For my curtains, I had 5 pleats (each created out of 8" of panel width) leaving about 3" between each. On the ends, you can put a single pin in a slot to keep the panel ends neatly attached to the rod.
 When you are done, it looks like this:
Then, you just need to either attach the hooks to rings and hang them, or use the rings directly on your rod.
There you go! I'm pretty excited about the way they turned out. I still need to do a lot more in this room, but having curtains up already makes it feel so much nicer!

Tuesday, November 19, 2013

Wine Tasting Party


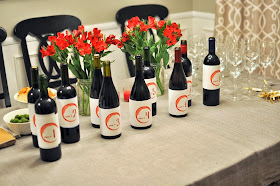
A couple weeks ago, a friend and I hosted a wine tasting party with some of our friends from work. To make the event more fun and add a little competition, we made the tasting blind! Each guest or couple brought a bottle of wine, that I covered up with wine labels that I made for the party.  We played a couple of games to see who could best identify the varietals of wine and voted on which was the favorite wine of the night.  

Of course, with wine you need cheese and chocolate! So, we had plenty of both and lots of other hors d'oeuvres for people to snack on throughout the night.
Roasted Tomato Bruschetta with Balsamic Drizzle- recipe to come!
I set the wine tasting station up in our dining room. I set out plenty of wine glasses, make sure you have at least 1 per person! We encouraged people to write their name on a tag and keep track of their glass ;)

I designed labels for the wine bottles that I printed at home and cut out of paper.  You can get two labels per sheet.
Wine bottle labels for blind tasting

To keep track of all of the different varietals that people brought and to act as a 'key' I wrote down the varietals on the chalkboard in our kitchen. This was helpful so people knew what types of wine were present. 

I also made a sheet that you can print at home and use to take notes and play the 'Guess the varietal' game that we played. 
"Rate that Wine" tasting notes


The party was a ton of fun, here are some more pictures!

Monday, November 18, 2013

Media Room Update

So, I've promised some pictures of our media room progress a few times now. Here's where we are with this room. It's come a long way since this time last year. I'm really happy with how things are going and even though it's taken a while, I feel like we've done a lot!
We really only need a few more things to be done until this room is 'complete.' Isn't it funny how once you get pretty close to finishing a room you see so many things you could have chosen? I've seen tons of red accessories out in stores now since the holidays are coming up. So, here's what we've done since you probably saw it last.

1. We put prints and photos in all of the frames in the gallery wall (except one)!

2. We bought a pub table and chairs for the nook area behind the couch.

3. We added new artwork to the wall in the nook. This print is a scene from Paris via Ikea. I love how much more dramatic this is the original art choice for this spot.

4. Added a chalkboard on the other wall in the nook area. I'm not sure what we're going to do with this chalkboard yet. But we are thinking of using it for either game night score keeping or lists of places we want to travel.

5. Added art to the area beside the window. I found these prints at HomeGoods and love that they have pops of red and feature pretty city scenes in New York, Paris and Venice.

6. Added a new throw for the couch. I picked this up at World Market and love the silver threads running through it. Find it here or a similar one from West Elm here.

7. And if you missed my last post here, we added a bar 'cart' area, which will be complete soon!

Whew, that's a ton of pictures. Hope you enjoyed the update!

Thursday, November 14, 2013

Media Room Bar

So, I haven't blogged in forever! I've been gone on a work trip for most of the last two weeks and hoped to blog while I was on the plane, but never got around to it. I've been making some updates in our media room to the bar area. 
I still need to get a print for the frame, but otherwise, this space is almost done. I think I'm going to either get this or this from Etsy. In general though, I love the way this area turned out. It is a fun addition to the room.  
On the top shelf, I have a wooden tray with a variety of liquors and accessories. Of course this includes red chevron straws and cute napkins that say "cheers" I found an awesome lamp at HomeGoods a few months ago that has a clear jar for the bottom and a removable top that I am filling with corks. I think this is a great way to tie in the theme. The lower shelves have glassware, mixers for cocktails and a wine rack. 
In this picture, you can see that we're making lots of other progress in this room. I'll be back to talk about those updates later :) Now it's time for a party!